In a nutshell
- Shooting log gives your video files more dynamic range
- Don’t panic — log video is supposed to look desaturated and flat straight out of your camera
- You always need to color correct and color grade log video clips
- Log video gives you better images, but it’s not always necessary
Most mirrorless and cinema cameras give you the option to shoot video with a log profile. It might be a feature you’ve heard about but not used yet. Alternatively, you may have tried the setting but been disappointed with how your footage looked. In this article, we will explain some of the ways to get the most out of your log video files. We will also give you some tips on what not to do so that your clips look the best they can.
What is log video?
Log is short for logarithmic. A log picture profile on your camera uses a different type of gamma curve than a standard profile such as Rec.709. The benefit of shooting in log is that your video files will have a higher dynamic range. Put simply, this means your camera will capture more detail in the bright and dark areas of your image than with a standard gamma curve. You also have more scope for color grading your video files in post-production.
RAW vs. Log
Log files are not the same as RAW files. RAW files record the data from your camera’s sensor without any processing and aren’t actually video files. They need to be processed by your editing software to convert them into video files for playback. However, log clips are still video files that can be played back straight away. Most manufacturers have developed their own log modes for the sensors in their cameras, such as Sony S-log, Canon C-log and Panasonic V-log.
Now you have an understanding of what log video is, let’s look at a few things to avoid.
Don’t panic
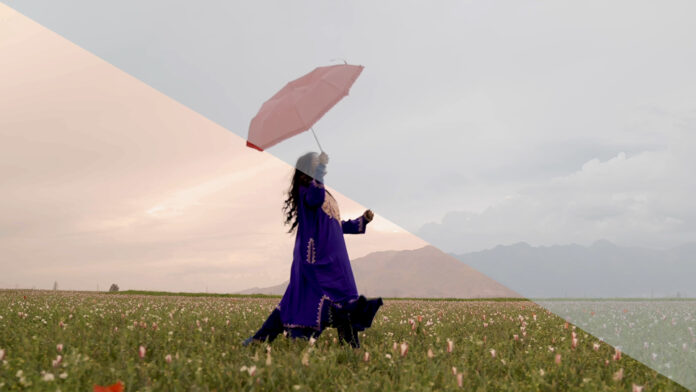
The first time you play back your log video, you will see that it looks desaturated and flat straight out of the camera. But don’t panic. That’s the way it’s supposed to look. The low-contrast image with washed-out colors is how your camera captures more dynamic range in your video files. It also means that there is a lot more detail in the video than you can see when you first play it back. However, you will need to process your video in post-production to see the full benefit of shooting in log.
Don’t skip color correction and grading
One of the disadvantages of log video is that you need to color correct and color grade your video before you finish it. This is so that you can bring out the proper exposure, contrast and colors of your clips. The first step is to color correct your video so that the white balance, contrast and saturation have a natural, neutral look. You could also apply a Rec.709 LUT (lookup table), especially if you have used one for monitoring when you filmed. After you have color corrected your clips, you then color grade them to create the mood and atmosphere that you want for the finished video.
Don’t mix log and Rec. 709
If you’re using more than one camera for a shoot, you should set them all to a log profile. It will be more difficult to match clips during the edit if one camera was shooting log video and the other was recording in Rec.709. You will also be limited to matching the log clips to the Rec.709 ones. This means you will lose the benefit of the additional dynamic range in the log files when you color correct your video.
Let’s move on to look at some positive steps you can take to make your log footage look the best it can.
Do control your exposure
Although log footage has a wider dynamic range than standard Rec.709 video, you still need to control your exposure. You’ll lose detail if you clip the highlights to pure white or crush the shadows to pure black. However, because log video looks so flat, it can be more difficult to judge exposure by eye from your camera’s screen. You should therefore use exposure tools such as histograms, zebras or false color. The best practice is to expose for the midtones or skin tones. You should keep these at around 50% to 70% on your histogram or 70 IRE with zebras. If your camera doesn’t have these exposure tools, you can always use an external monitor that does.
Do use a preview LUT
With a lot of cameras, you can apply a preview LUT to the image on the built-in monitor screen. Again, if your camera can’t do this, an external monitor is an ideal solution. A preview LUT converts the displayed image to Rec.709 so you can see the full range of colors and contrast at the time of filming. Importantly, however, this look isn’t burned into your video. The recording will still be a flat, desaturated log image ready for color correction and grading in post-production.
Do monitor your recording
Although log video files have a wider dynamic range than Rec.709 files, they do not have the same latitude as RAW files. Therefore you do need to keep an eye on your scopes while shooting. This will ensure that you aren’t caught out by a large change in exposure if the sun comes out or goes behind a cloud, for example. While you can adjust a log file more than you can a Rec.709 file, you can still clip or crush your video if you aren’t careful.
Do record in 10-bit
Log video files will always need to be color corrected and color graded. It is therefore always better to record in a 10-bit video file format rather than an 8-bit one. The files are larger, but the extra quality is worth the hardship. While 8-bit video files can reproduce over 16 million colors, 10-bit files can show over one billion colors. The additional bit depth also makes the files much easier to color correct and grade without showing artifacts such as banding. In addition, many cameras can now record 10-bit video internally. However, if yours can’t, you can add an external recorder to your setup to capture 10-bit video files.
Should I shoot in log?
Now you have a better understanding of how to get the most out of your camera when shooting in log. But it’s important to recognize that it may not always be the best format to use. Because log footage always needs to be processed in post-production, the workflow is longer and more involved. If you need a quick turnaround on your video, or you’re handing the camera files to someone else to edit, it may be better to shoot in a standard Rec.709 profile. Additionally, for short social media or vlog clips, the additional post-production work might be overkill for what you need. However, for live event shooting such as a wedding, the additional dynamic range can save your clips if lighting conditions change during the shoot. Also, for filming scripted movies, the ability to color grade more effectively is a good reason to shoot log.
You’re ready for log shooting
Shooting log video means you can record an image with more dynamic range from your camera. It also gives you more scope for color correction and color grading in post-production. However, it’s not always the best option. With the knowledge you have gained from this feature, you now have the understanding to be able to decide when it’s best to shoot in log and when a regular Rec.709 profile will make your life easier.


