
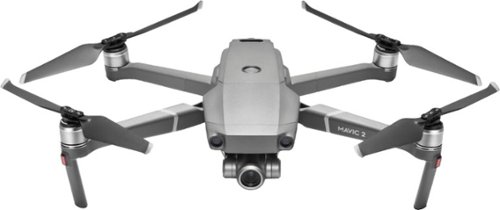
 With the Mavic 2 Pro and Mavic 2 Zoom, DJI has segmented their marketplace into those who want or need a zoom and those who would rather have better image quality. If they would have combined those two ideas, they would have a drone that would be both easy to manage and delivers a high-quality image. At this point, its expected that DJI would create a drone that flys great; they have been doing that for years now. Anything less would be a major miss step. So, in these newest offerings, the image quality is their major focus — pun intended.
[vimeo 296109602 w=640 h=360]
What are the differences?
With the Mavic 2 Pro and Mavic 2 Zoom, you have the same drone mounted with two different cameras. The Mavic 2 Pro uses a Hasselblad 20MP one inch CMOS Sensor with an adjustable aperture. The Zoom has a 12MP 1/2.3 inch CMOS Sensor. The almost doubling in size of the sensor in the Pro comes with a fixed (35mm equivalent) 28mm lens. Other the other hand, the Zoom has two times optical zoom at (35mm equivalent) 24mm-48mm. We predict we’ll have to wait for the Mavic 3 for a large sensor with a zoom.
In every way outside of the ability to Zoom, the Pro is a better camera. For video shooters, the Pro gets you 10-bit video and a log picture profile. There is an adjustable aperture from f/2.8 to f/11. That means that you don’t need to reach for an ND to shoot with lots of light. An ND filter is still beneficial, however, for timelapse or Hyperlapse during the day. For aerial photographers, the lack of a zoom isn’t as impactful, as a crop is more acceptable in digital still images. When shooting in RAW, the Mavic 2 creates DNG files that are key in extracting the most dynamic range from your image. There’s no option for RAW video, but when shooting hyperlapse, DNG can also be captured so you can take advantage of its expanded color space and dynamic range when converting those images into a video.eo.
We didn’t need to get nearly as close to our subject and could take advantage of space compression when shooting zoomed in.
The Zoom, however, was so handy when flying. We didn’t need to get nearly as close to our subject and could take advantage of space compression when shooting zoomed in. Shooting telephoto will bring the background closer to the foreground. When shooting a high school football stadium, this allowed us to bring the buildings surrounding it closer into the frame. Additionally, we were able to stay away from flying over people because we were able to zoom in to the desired framing instead of flying into proper framing like with a fixed focal length. There are situations where one would either desire space compression or need to shoot further than proper framing would require that make it hard to undervalue the zoom.
[vimeo 298207254 w=640 h=360]
The Drone
The Mavic 2 Zoom and Pro have the same capacity as an aircraft. They have a very fast 45 miles per hour top speed and a top battery life of 31 minutes. Depending on conditions and the way you fly, expect 3-4 minutes less than that. If the conditions are perfect and you are not flying hard, you will get 31 minutes of flight.
The drones also have downward, upward, forward, backward, left and right sensors. This is super handy if you are flying near things. We found it useful when setting up a hyperlapse that was to circle around a point. We wanted to be near a tree to reveal the building we were shooting and the sensors helped us get close, but not too close to the tree for the foreground. It also was helpful when lighting made distance hard to verify. When the drone is in silhouette, it’s hard to tell how close it is to things, but the alarm did its job well. When the sensors are engaged, the overall speed will be limited but we didn’t feel the desire to fly faster, especially when flying close to potential obstacles.
There are few things about every DJI drone we’ve ever reviewed that we dislike. The first is how the updates get fed to the user. During the few weeks we had the Mavic 2 Pro, we had three separate updates to do. It would be great if they pushed a notification 24 hours in advance to let pilots know that an update was coming. Whenever an update is needed, it takes up precious power to do so, thus taking away flying time. We wish that DJI would list what is in each update and allow you to bypass them if updating is a burden on your shoot or when it’s not a safety update. On top of that, DJI doesn’t give any notification of how long the update will take to install.
Next, the notification to fly safe and that you agree to terms of use is hard to read, covers the camera and has a very small box to check to agree. If the notification came before take off, it wouldn’t be in the way when flying. For nervous pilots, nothing is worse than needing to take your hands off the controls to agree to something on the screen. Additionally, DJI needs to make the notice easier to read and the box that needs to be checked easier to see. DJI does drones better than any other brand on the market, yet they still have the same poor notification for updates and agreements they’ve always had. These are all small things that would greatly improve flying.

The Hasselblad one-inch sensor
The size of the sensor and Hasselblad logo scream high image quality. The one-inch sensor is a nice upgrade from the original Mavic Pro. Not only do you get more megapixels, but gaining the control of the aperture is huge. Being able to close up the aperture so you don’t have to crank the shutter speed up makes a much smoother video without staccato. Staccato is shuttery video caused by a high shutter speed. Staccato is most noticeable in moving subjects. Although the camera can shoot down to f/2.8, don’t expect to get much noticeable shallow depth of field thanks to the small sensor and wide angle lens. The aperture control will be much more helpful in lowering the amount of light to the sensor.
[vimeo 298055936 w=640 h=360]
[vimeo 298051047 w=640 h=360]
The Pro gives more ISO control than the Zoom; however, it’s only beneficial when shooting stills. When shooting video, the max ISO is 1600. The nice thing about the Pro is, regardless of what ISO you shoot at, there is minimal noise. We saw noise in the image starting at ISO 800 and increasing to 1600. With that said, the noise that is seen is completely acceptable for professional use. Its minimal and there is no color shift amongst the noise.
[vimeo 298236020 w=640 h=360]
The last big video feature is the ability to capture 10-Bit Dlog-M and 10-Bit HDR video. Anytime you can shoot a higher bit depth, you should.If you want to learn more about the difference between 8-bit and 10-bit video, read Understanding Bit-depth and Color Rendition for Video.
To take advantage of D-logM you must shoot in 10-bit. There is one drawback with shooting 10-bit with the Mavic 2 Pro: You must correct the barrel distortion after you shoot. The camera and drone do not correct this for you. It’s not terribly hard to correct. If you are a Premiere Pro CC user, there is a built-in effect call lens distortion that makes easy work of it.
Using the Mavic 2 Pro for photography is a real treat. The higher megapixel sensor allows for a much nicer image than from the smaller sensor camera in the Zoom. When shooting hyperlapse, we choose to create from the RAW images rather than the compiled video the drone makes for you. The only disappointment here is that its only 8-bit bit depth when shooting stills. We did have to do some stabilization to the compiled hyperlapse photos to get smooth motion. Hyperlapse is going to work best on large objects, as the small amount of movement up and down is easier to notice on smaller objects. For example, when shooting a football stadium the up and down movement between shots is hardly noticeable, but when shooting a building 1/10th the size, the movement is more apparent. For hyperlapse during the day, we recommend shooting with an ND filter so you can have a longer exposure per image. This will allow for moving things to appear as light streaks. Instead of your video looking like speed up video, it will have a more smooth look and imply time passing in a more surreal way.

Zoom to give you room
Getting to shoot both drones at the same time gave us a unique experience. After our first dual flight, the biggest takeaway was how useful the zoom feature is. Because of the zoom, we were able to get the framing we wanted for any shot while also flying the drone further away. Being able to fly further from your subject matter made flying much less intense. If it wasn’t for 10-bit video in the Pro and adjustable aperture, the Mavic 2 Zoom would be our choice.
One of the most fun intelligent flight modes only available on the Zoom is the zoom dolly. This simple shot is both a zoom and dolly at the same time. While dollying back, the camera zooms forward. Because of space compression, the subject stays the same spot while the background and foreground change perspective. Also known as a zolly, the zoom dolly was invented by second cameraman Irmin Roberts on the Alfred Hitchcock movie “Vertigo.”
[vimeo 297806344 w=640 h=360]
The Zoom offers a more limited exposure control. With only shutter and ISO control, an ND filter is a necessity for capturing video with the Zoom. An ND filter will allow for lower shutter speeds to gain proper exposure, causing less staccato video.
We wanted to see what the low-light performance was, so we started at the lowest ISO of 100 and doubled it till we hit its maximum. When shooting in HEVC, the ISO is limited to a maximum 1600. Shooting in H.264, the ISO maximum is 3200. Regardless of if you shoot H.264 or HEVC, noise is introduced into the picture starting at ISO 400. ISO 800 is the highest ISO before the noise starts to color shift. We wouldn’t recommend shooting higher than ISO 800 if you require a professional outcome.
[vimeo 298219732 w=640 h=360]
[vimeo 298055936 w=640 h=360]
Marketplace
DJI has more drone offerings than any other company. They offer drones from $400 for the Spark all the way up to the Inspire 2 with the Zenmuse x7 camera for more than $6,000. With that said, there are a few other companies that offer similar drones to the Mavic 2 Pro and Zoom. We’ll be looking at the Autel EVO, Yuneec Mantis Q and the original Mavic Pro.
The EVO and the Mavic Pro both cost $1,000 and the Mantis Q is $500. Consider the original Mavic Pro to be a more stripped down version of the Zoom. One of the main things that you get in the original Mavic Pro that isn’t in the Zoom is the ability to shoot in log. Additionally, the original does not have some of the intelligent flight modes of the Mavic 2. The Autel EVO has almost identical features as the classic Mavic Pro; however, it has a bit faster top speed. The Mantis Q shoots 4K video, but is a smaller drone and is more similar to the Spark. It shoots 4K video, as well.
Final thoughts
The Mavic 2 Pro and Zoom are fantastic drones. They are great to fly and have a wonderful image. Choosing between the two is difficult. The Zoom is great to have and makes framing much easier, but 10-bit video and the higher megapixel count of the Pro are hard to go without, especially when they are only $250 apart. We’d pick the Pro for most applications but wish it offered a zoom as well.
SUMMARY
STRENGTHS:
- 10-Bit Dlog-M video
- Adjustable Aperture on Pro
WEAKNESSES:
- Pro doesn’t offer a zoom
- No log video on the zoom
RECOMMENDED USES:
- Documentary Filmmaking and Journalism
- Corporate and Event Videography
- Marketing Video Production

- Maximum Takeoff Weight: 2.00 lb / 907 g
- Maximum Horizontal Speed: 44.7 mph / 72 km/h (S-Mode)
- Maximum Wind Resistance: 23.6 mph / 38 km/h
- Maximum Flight Time: 31 Minutes
- Maximum Hover Time: 29 Minutes
- 3D Object Detection Operating Range: 36.1 to 131.2′ / 11.0 to 40.0 m
- Required Object Reflectivity: >20%
- Vision System: Downward, Forward, Backward, Left, Right
- Operating Range: 1.6 to 131.2′ / 0.5 to 40.0 m
- Obstacle Sensory Range: 36.1 to 131.2′ / 11.0 to 40.0 m
- Operating Frequency:
- 2.4 GHz (2.400 – 2.483)
- 5.8 GHz (5.725 – 5.850)
- Maximum Operating Distance:
- 4.97 mi / 8000 m at 2.4 G
- 4.97 mi / 8000 m at 5.8 G
- Connectivity:
- 1 x Lightning
- 1 x Micro-USB
- 1 x USB Type-C
- Photo Format: JPEG, DNG
- Video Format:
- 3840 x 2160p at 24/25/30 fps
- 2688 x 1512p at 24/25/30/48/50/60 fps
- 1920 x 1080p at 24/25/30/48/50/60/120 fps
- Recording Media: microSD (Up to 128 GB)
- Photo Modes: Auto-Exposure Bracketing (AEB), Burst Shooting, Interval, Single Shot
Mavic Pro 2 Camera
- Sensor: 1″ CMOS
- Effective Pixels: 20 MP
- Lens Field of View: 77°
- Aperture: f/2.8 – 11
- Minimum Focusing Distance: 3.3′ / 1.0 m
- Photo ISO Range:
- 100 – 3200 (Auto)
- 100 – 12,800 (Manual)
- Video ISO Range: 100 – 6400 (Auto)
- Electronic Shutter Speed: 8 – 1/8000 Second
- Photo Resolution: 3:2: 5472 x 3648
Mavic 2 Zoom Camera
- Sensor: 1/2.3″ CMOS
- Effective Pixels: 12 MP
- Lens Field of View: Horizontal: 83°
- Aperture: f/2.8 – 3.8
- Minimum Focusing Distance: 1.6′ / 0.5 m
- Photo ISO Range:
- 100 – 1600 (Auto)
- 100 – 3200 (Manual)
- Video ISO Range: 100 – 3200 (Auto)
- Electronic Shutter Speed: 8 – 1/8000 Second
- Photo Resolution: 4:3: 4000 x 3000
- Gimbal Number of Axes: 3 (Pitch, Roll, Yaw)
- Control Range Pitch: -90 to 30°
- Yaw: -75 to 75°
- Angular Speed Pitch: 120°/s
- Flight Battery Chemistry: Lithium-Ion Polymer (LiPo)
- Capacity: 3850 mAh / 59.29 Wh
- Charging Temperature: 41 to 104°F / 5 to 40°C
- Weight : 10.48 oz / 297 g
- Operating Temperature: 14 to 104°F / -10 to 40°C
- Overall Dimensions:
- 3.6 x 3.3 x 8.4″ / 91.0 x 84.0 x 214.0 mm (Folded)
- 9.5 x 3.3 x 12.7″ / 242.0 x 84.0 x 322.0 mm (Unfolded)


