
Videographers know that the number one rule of recording high-quality sound is to position the microphone as close to the subject as possible. In most scenarios, this means placing the pickup element a few inches from the sound source. We can go to great lengths to maneuver our microphones into the closest possible proximity to our subjects. But sometimes that isn’t an option. There are times when you simply cannot position a mic close to your subject. Enter the parabolic microphone.
Maybe you need to capture the cries of coyotes, or the songs of mockingbirds. Maybe you want to record the cadence of a quarterback (without getting yourself tackled). Or, maybe you need to secure your sound on the sly, like a spy, for your hidden-camera, crime-stopper show. Sometimes a production require you to get that mic in close but that can endanger your life, damage your equipment, or blow your cover. A parabolic microphone dish may be the most sound solution around.
Para-what-ic microphone?
A parabolic dish is a mathematical miracle that gathers and focuses light and sound waves into a single point. They are used in headlights, solar cookers, and satellite TV receivers. The parabolic microphone dish leverages geometry to turn an ordinary microphone into a hyper-directional monster mic. This allows you to recording clear sound at several hundred feet. Unless you produce sports or wildlife video you may only use a parabolic setup on rare occasion.
If you aren’t ready to invest in a professional parabola, you can build your own parabolic microphone dish. This only requires a few simple tools and materials you may already have. Your homemade parabolic dish may not perform quite as well as a professionally manufactured model. This solution will significantly improve your ability to grab sound waves, and may provide all the power you need. Before starting the build, its important to know how a parabolic microphone dish works.
Parabolic microphone science
There is no such thing as a parabolic microphone. When we talk about a parabolic mic, we’re really referring to recording audio with an ordinary microphone that’s boosted by a parabolic dish. A parabola is a specific geometric curve that has a distinct mathematical property. When a straight line hits any point on the inner surface of a parabolic curve it reflects off the slope to a single common point centered in front of the curve. This position is the focal point of the parabola.
In terms of audio, this means that when multiple sound waves from a sound source strike the sloped inner wall of the dish, they bounce back to a focused position in front of the disk. When a barrage of sound waves hit the parabolic dish, the waves are collected together at the focal point. An ordinary microphone in the proper position can capture an amazing analog amplification of the sound source.
Choosing a microphone
The performance and functionality of a parabolic microphone dish is more about shape and construction than the quality of the microphone itself. However, having a good mic doesn’t hurt.
Any ordinary mic will work for recording audio from the parabolic dish. There are generally two types of microphones used with a parabolic dish. One option is a microphone with a directional cardioid pickup pattern, like a handheld mic. Another is to use a small microphone, like a lavalier, with an omnidirectional pickup pattern. In either case, the mic is typically mounted on an arm that suspends it at the focal point of the dish. The pickup element faces into the bowl of the parabola. We elected to use the smaller and lighter wireless lavalier mic.
Because of it’s omnidirectional pickup pattern, we added a small circular backplate. This will help focus the lavalier on recording the reflected sound source. For recording audio, we connected our wireless lavalier to our video camera’s XLR input. You can use any portable audio recorder if you prefer.
Microphone position
The key to recording the best audio from your parabolic dish setup is to position the microphone right at the reflected focal point in front of the parabola. The sweet spot varies from dish to dish depending on its depth and diameter. We wanted to test a variety of different dishes. We mounted our lavalier on the arm of a C-stand so we could easily move it around. While listening through headphones we determined the ideal location for each dish. Once you have located the focal point of the parabolic dish, take a measurement, and attach a support arm to use as a permanent mic mount.
Choosing a parabolic microphone
The most important part of your parabolic microphone is the dish itself. The parabolic microphone dish does not function like a funnel or megaphone, but as a reflector of sound waves. The size, shape and material of the bowl all influence its reflectivity. Many do-it-yourself designs use umbrellas, frying pans, wok lids and other cooking instruments. You may use any of these to build a parabolic microphone dish that will improve your microphone’s long-distance performance. Some choices are better than others. Generally, you want the dish to have a balance of three properties: a hard surface, large size, and the proper curvature.
The parabolic dish leverages geometry to turn an ordinary mic into a hyper-directional monster capable of recording clear sound at several hundred feet.
Curve:
Because a true parabola is a specific geometric curve, few homemade dishes have full parabolic performance. The trick is to find a dish that closely matches the shape of an actual parabola. If you have access to an old satellite dish, you have an excellent option. While these receivers have an off-axis focal point, they are a functioning parabola. That said, a dish of any shape will work to capture sound waves to a degree. For the best results, select one that has a smoothly curved bottom, not a flat one.
Material:
The ideal material for your parabolic microphone dish will be rigid and thick, but lightweight. Plastic, acrylic and metal dishes are highly reflective. They do not allow sound waves to pass through them, making them more desirable choices. Dishes that have holes, like colanders, are not good reflectors, even if they are shaped well. On careful examination, thin walled metal dishes may introduce a small amount of metallic ping. A dish made of thick plastic or similar material may be the best choice.
Size:
Audio recorded from parabolic microphone dishes tends to have a low frequency response. This is related to the science of sound waves. Small parabolic dishes are simply not capable of recording the full range of sound required for recording audio at full fidelity. However, the science of sound waves suggests that if all other aspects of the dish are identical. A larger parabola could grab the low frequencies. So bigger is actually better. However, the dish is more likely to be impractically large before good low fidelity sound can be recorded in this instance.
The best way to find a dish that meets all three criterion equally well is to buy an actual parabolic dish from a dealer. Professional parabolic dishes are readily available, but they can be costly. If you need a high quality parabolic dish for serious sound production take a look at the JonyShot from JonyJib. ($1,250; microphone not included) It includes a 24-inch dish with handles, a tripod mounting plate, and an isolated microphone mount. As a more affordable option, you can purchase Sound Shark’s SS1 Long Range Dish. This uses a standard lavalier, for $285.
Using the parabolic dish

The only way to know that you are capturing a strong, clear signal is to wear headphones so you can monitor the sound source and make adjustments as you record. Depending on how far you are from the subject, even a small twist of the dish can move the mic off target, so recording requires an active and attentive operator.
Parabolic microphone dish tests
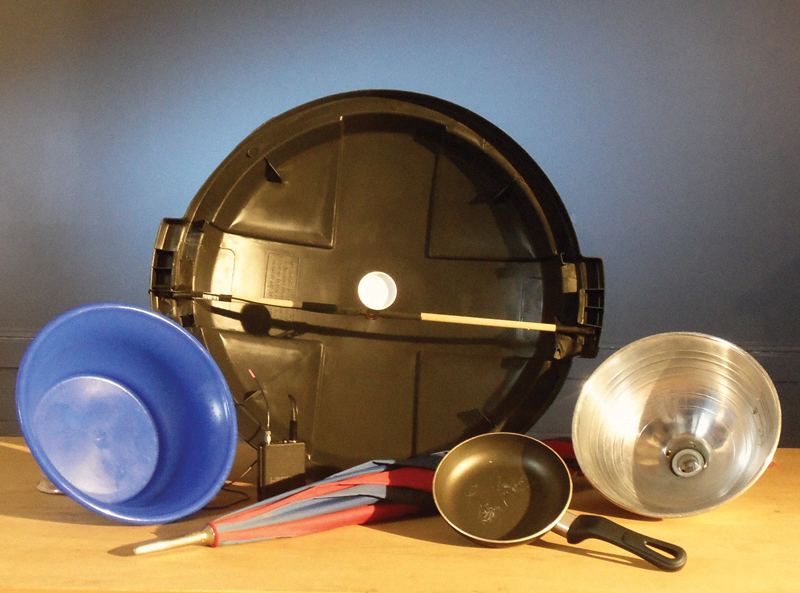
For our project we tested five homespun dish options to determine which would be the best to build:
- 6” omelet pan
- 10.5” aluminum shop light shroud
- 12” plastic popcorn bowl
- 22” plastic trash can lid
- 45” golf umbrella
Our tests were performed by playing two different soundtracks, a loop of chirping crickets, and then a music bed, at a distance of approximately 30 feet. We mounted a trusty handheld cardioid microphone and a lavalier to the arm of a C-stand pointing into our dishes while listening through headphones. We recorded samples using each dish, then returned to the edit bay to analyze our findings. While it is difficult to assess comparative quality while you are recording, we noticed a clear difference in frequency response after ingesting the clips into our editing application and playing them back through studio monitors.
Based on our tests, we determined that our 22-inch trash can lid performed the best. Its large diameter, uniform curve and plastic construction all helped push its performance past the other dishes we tested. In this test we also learned where our mic needed to be positioned, so note this during your tests.
The microphone build
With our dish selected, it is time to build our DIY parabolic mic. Here’s what you’ll need for the dish which is designed to carry a lavalier mic. We went with this option since it was light and wireless, if we’d gone with the cardioid mic we’d want a shock mount, much like the one for a shotgun mic.

Materials
- 22” plastic 32gal. trash can lid
- 6” strip of 1/2” wide flexible metal strap
- 24” x 1/4” wooden dowel
- milk jug lid
Tools
- Metal snips
- Small hacksaw
- Gaffer’s tape
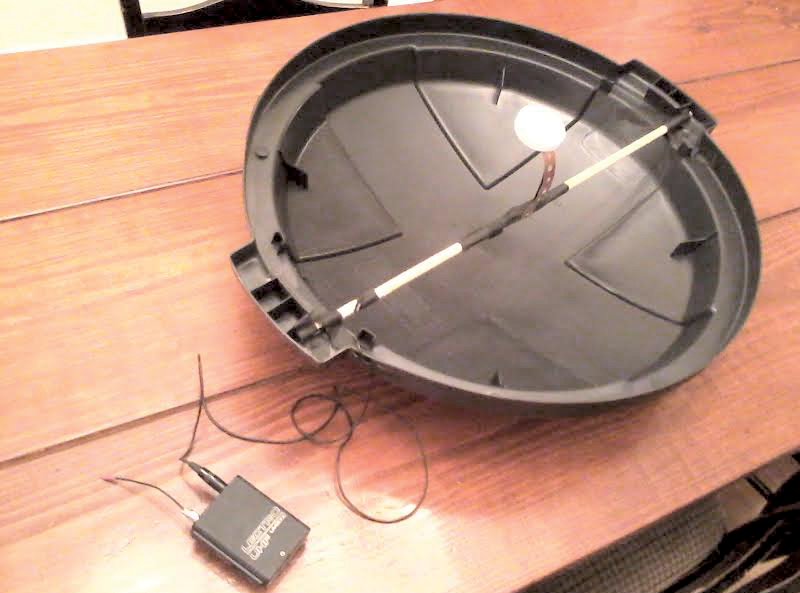
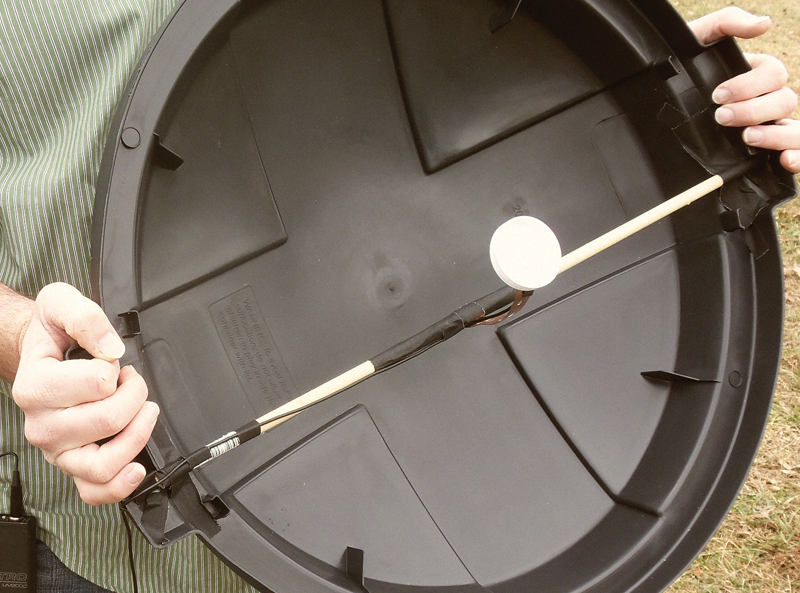
In addition to the desirable size and shape of the lid we selected, we discovered that its handles worked perfectly as grips; so there was no need to add handles. We simply needed to build a cross bar and microphone mount.
The build
First, using the hacksaw, we cut a piece of 1/4-inch dowel that is roughly the diameter of the trash can lid so it would fit snugly into the molded notches on the inside of the handle. We then used gaffer’s tape to hold it in place. The cross bar fell just south of center on our lid, spanning our dish 1 1/ 4-inch off the mid-line.

Next, using metal snips, we cut a 6-inch piece of flexible flat metal strap to serve as our center extension to hold the lavalier microphone. We wrapped one end of the strap around the center of the dowel and secured it with gaffer’s tape. We then shaped it into a slight curve, angling up and out to line up with the center of our dish. At approximately eight inches from its bottom center point when laying on its back, we taped the wireless lavalier’s pickup element to our mount. Securing the cord along the dowel and around the back of the dish with tape, we left plenty of wire for the transmitter to clip onto the operator’s belt. Finally, we attached a 2-inch lid from a milk jug to the back of the mic mount. The will help direct the lavalier’s omnidirectional pickup pattern back into the dish.
The results
While our research required hours, the build itself took less than 30 minutes. The total cost for the project, minus the trash can lid we had on hand, but including the milk, was less than $25. So give it a try. If you don’t have a garbage can lid to dedicate, use whatever dish you can manage, or spring for a professionally formed parabola. With a little creativity, and some simple science, you’ll be using your homemade parabolic dish microphone in an hour or so.
Sidebar
Parabolic microphones and football
The most visible place to see a professional parabolic microphone dish in use is on the sidelines of an NFL or NCAA football game. Just turn on your television on most any weekend in September through January and watch the sidelines for operators holding the cool composite dishes. Though wireless mics are common on the field, until a few years ago, the NCAA used primarily parabolic mics to hear referees. Fox Sports uses six parabolic mics at each NFL game they cover: two on each sideline and one at each of the end zones. Fox Sports chose the Klover MiK 26 parabolic dish ($2,250; microphone sold separately).
Chuck Peters is a 3-time Emmy Award winning writer and producer. He is an independent producer and media consultant.


